Getting Started Using JDBC In Java Programming

Backend Developer.(Spring Boot) | Technical Writer
Hello, and welcome to my blog. In this article, I will introduce you to JDBC and all you need to get started using JDBC. In addition, you will learn to create, read, update and delete data on a database using JDBC API.
Tools
- Intellij IDEA
- Java 8 JDK
- MySQL Database
Prerequisite
- Basic understanding of Java
- Have used MySQL or knowledge of any other relational database query language
- Basic knowledge of using IntelliJ IDEA
JDBC stands for Java Database Connectivity. JDBC is an API in Java that enables Java applications to connect and process data on the database.
JDBC API is of two types; the first is referred to as JDBC API which is used by application programmers to connect and access data from a data source while the second is referred to as JDBC Driver. JDBC Driver is a set o Java classes that implement a JDBC interface targeted at a particular database. JDBC Drivers come with standard Java but their implementation depends on the database in use. Such an implementation is referred to as JDBC Driver.
JDBC API – Key Classess and Interfaces
• JDBC Connection Interface
• JDBC Statement Interface
• JDBC PreparedStatement Interface
• JDBC DriverManager Class
• JDBC CallableStatement Interface
• JDBC ResultSet Interface
• JDBC ResultSetMetaData Interface
• JDBC DatabaseMetaData Interface
We would only be learning how to use the DriverManager class and use the implementation of the Connection, Statement, and ResultSet interface. In the article sequel to this one we would discuss the PreparedStatement interface.
Types of JDBC Driver
• Type 1: ODBC bridge driver
• Type 2: Java + Native code driver
• Type 3: All Java + Middleware translation driver
• Type 4: All Java driver
Type 4 JDBC driver is what we will be using as it has the advantage to connect and interact directly with the database. Before we proceed create a database and a table. Name the database fk_server and the table fk_example. Let the table have four columns an id, firstname, lastname, and email. Insert dummy data into the database.
Now create a new project In IntelliJ IDEA. We then need the mysql-connector-java because we are using MySQL database with the Type 4 driver. Download the mysql-connector-java-here. Follow these steps to register it has a dependency on your project.
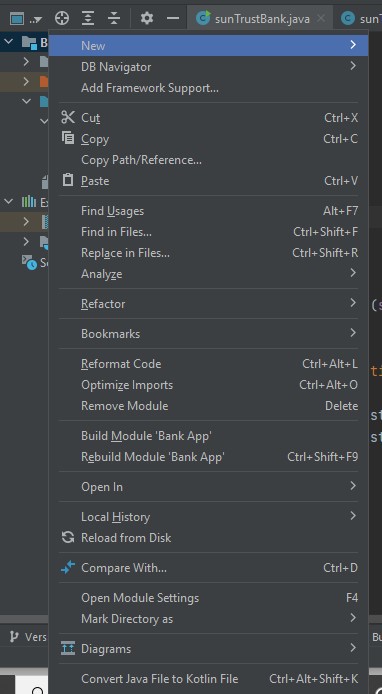
Right-click on the main name of the project in IntelliJ. From the dropdown as in above select open module settings
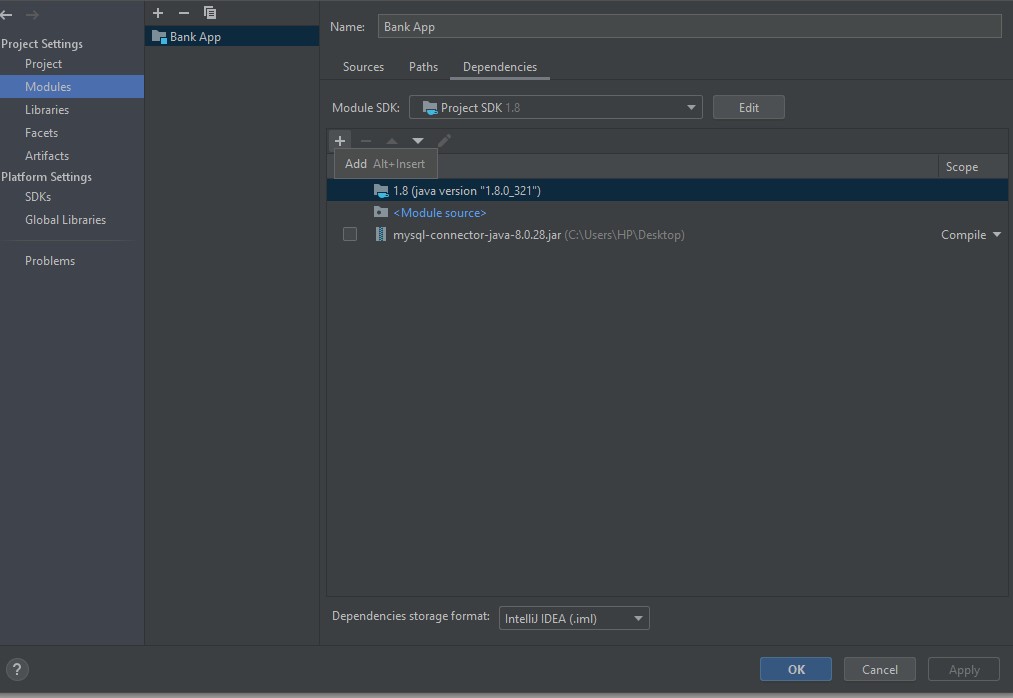
From the module click the plus symbol and select JARs or directories and upload the mysl-connector-java dependency. Ensure you have extracted the file if it is in zip before uploading and only upload the jar file.
Open connection to a database
// Database connection fields
String url = "jdbc:mysql://localhost:3306/fk_server?useSSl=false";
String user = "root";
String pword = "";

// open connection to database
public void openConnectionJDBC() {

    try(Connection connection = DriverManager.getConnection(url, user, pword)) {

    } catch(SQLException e) {
        e.printStackTrace();
    }

}
Create/Insert
// Database connection fields
String url = "jdbc:mysql://localhost:3306/fk_server?useSSl=false";
String user = "root";
String pword = "";

// INSERT
public void insertData() {

    // open connection to database
    try(Connection connection = DriverManager.getConnection(url, user, pword);
        // create a statement object to perform query
        Statement statement = connection.createStatement();)
    {
        // execute statement object to insert into database
        statement.executeUpdate("INSERT INTO fk_example VALUES('Peter', 'Doe', 'peterdoe@yahoo.com')");

        System.out.println("Data insert success");
    } catch (SQLException e) {

        e.printStackTrace();
    }
}
Update
// Database connection fields
String url = "jdbc:mysql://localhost:3306/fk_server?useSSl=false";
String user = "root";
String pword = "";

// UPDATE
public void updateData() {

    // open connection to database
    try(Connection connection = DriverManager.getConnection(url, user, pword);
        // create statement object to perform query
        Statement statement = connection.createStatement();) {

        // execute query to update database
        statement.executeUpdate("UPDATE fk_example SET firstname = 'John', email = 'johndoe@gmail.com'  WHERE id = 1");

        System.out.println("Data update success");
    } catch (SQLException e) {
        e.printStackTrace();
    }
}
Delete
// Database connection fields
String url = "jdbc:mysql://localhost:3306/fk_server?useSSl=false";
String user = "root";
String pword = "";

// DELETE
public void deleteData() {

    // open connection to database
    try(Connection connection = DriverManager.getConnection(url, user, pword);
        // create statement object to perform query
        Statement statement = connection.createStatement();)   {

        // execute query to delete from database
        statement.executeUpdate("DELETE FROM fk_example WHERE id = 1");

        System.out.println("Delete Success");
    } catch (SQLException e) {
        e.printStackTrace();
    }
}
Read
// Database connection fields
String url = "jdbc:mysql://localhost:3306/fk_server?useSSl=false";
String user = "root";
String pword = "";

// READ
public void getData() {

    // open connection to database
    try(Connection connection = DriverManager.getConnection(url, user, pword);
        // create a statement object to perform query
        Statement statement = connection.createStatement();) {

        // execute the statement object and return a result
        ResultSet result = statement.executeQuery("SELECT * FROM fk_example");

        // process the result
        while (result.next()) {

            int id = result.getInt("id");
            String firstname = result.getString("firstname");
            String lastname = result.getString("lastname");
            String email = result.getString("email");

            // output result
            System.out.println(id + " Name: " + firstname + " Surname: " + lastname + " Email: " + email);
        }

    } catch (SQLException e) {

        e.printStackTrace();
    }
}
Closing connection is not required because we use a try-with-resource statement to auto-close the resources in the examples.
That's all have got for now, if you have got a questions drop it in the comment section. Thank you for your time and have a lovely day. You can connect with me on LinkedIn
Credits


