Basic Frontend Knowledge To Getting Started In Backend - Part 1
HTML FOR BACKEND DEVELOPER

Backend Developer.(Spring Boot) | Technical Writer
Hi and welcome once again to another tutorial. Today you will learn the basics of frontend web development to get you started as a beginner in backend web development. I am assuming you have zero programming experience. Therefore, if this is applicable to you; then you are definitely in the right place.
While starting out learning backend web development I was lucky to have had encounters with HTML and CSS, which I letter realized from my massive progress in my learning path of backend web development. Those few months of contact I had learning and practicing HTML and CSS had a great deal of impact on my progress.
From my experience helping newbies in several tech communities. I realize the majority of backend newbies (i.e., those without programming experience) had to work twice as hard as their colleagues who have had experience with frontend to be at the same pace due to the slight knowledge gap.
In this tutorial, you will learn practical and solely necessary knowledge of frontend to put you on track if you just about to get started. If you already started; take a deep breath, pause, go grab a chill drink, go through this tutorial, and you are back on track in no time.
A BRIEF INTRODUCTION TO HTML
HTML stands for HyperText Markup Language. HTML is a standard markup language that forms the basic foundation of all web page structure. Its invention date back to the creation of the World Wide Web by Sir Tim Berners-Lee in 1989. HTML consists of a series of elements that tell the web browser how to display the content.
HTML ELEMENTS
Elements label pieces of content such as “this is a link”, “this is a heading” etc. An element consists of an opening tag, a closing tag, and some content in between the tags.

SIMPLE HTML DOCUMENT
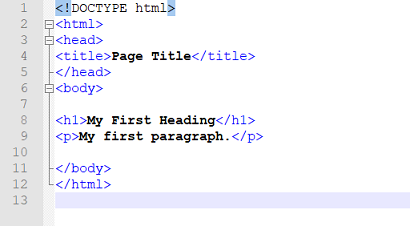
Explaining the simple HTML document below.
DOCTYPE html: This is a declaration telling the web browser this is an HTML version 5.
html: This is an opening tag, and the closing tag found on line 12 from the picture below. It contains all other elements and tags on a web page.
head: This is also an opening tag with the closing tag found on line 5 from the picture below. It contains mainly the title tag and other tags.
title: This is an opening tag with the closing tag found on the same line. Its content is usually shown on the tab of the web browser.
body: This is an opening tag with a closing tag found on line 11 from the picture above. It contains all the body content of the web page.
h1: This is a tag that use to display headings on a web page.
p: This is a tag that is used to display paragraphs on a web page.
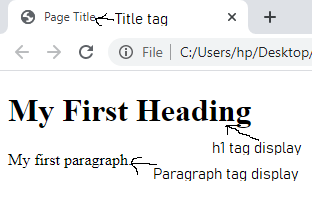
Below is how it will display in a web browser.
HTML TAGS AND USES
We have discussed a couple of HTML elements and tags above. Below we will discuss few others with source code you can copy and try out on your computer. Don’t forget you learn faster by doing. Heading tags
Heading tag
These are tags used for heading on a web page. And they are six in number, with each heading tag having a different font size as shown below.
The h1 tag display with the biggest font size. They are used for Titles.
The h2 tag display with a font size smaller than the h1. Ther used as subheadings.
The h3 tag display with a smaller font size than that of h2.
The h4 tag display with a smaller font size than that of h3.
The h5 tag display with a smaller font size than that of h4.
The h6 tag display with a smaller font size than that of h5.
Below is how they are written.
<h1> The h1 tag display with the biggest font size. They are used for Titles. </h1>
<h2> The h2 tag display with a font size smaller than the h1. Ther used as subheadings. </h2>
<h3> The h3 tag display with a smaller font size than that of h2. </h3>
<h4> The h4 tag display with a smaller font size than that of h3. </h4>
<h5> The h5 tag display with a smaller font size than that of h4. </h5>
<h6> The h6 tag display with a smaller font size than that of h5. </h6>
Empty tags
Empty tags are tags that don’t have closing tags and content. They are only opening tags.
Example:
Line break tag is an empty tag used to break a line and move whatever that follows to the next line; despite the present line not been filled.
Horizontal line tag is an empty tag use to draw horizontal lines.
Below is how they are written.
//Line break tag
<br >

//Horizontal line tag
<hr >
Listing Tags
Listing tags are you to display a list of items on a web page. Listing tags can list out items on a web page either in a numbered format, bullet format, or even nest list between lists. We have three different methods of listing items.
Ordered list.
Unordered list.
Definition list.
Ordered list
In the ordered list tag, items are listed on the web page in a format numbered from one. Below is the syntax of the ordered list and how it will be displayed by the web browser.
// <ul> stands for ordered list
// <li> stands for list

<ol>
  <li> list 1 </li>
  <li> list 2 </li>
</ol>
Unordered list
Unordered list tag displays web page items in a bullet structure. Below is the syntax of the unordered list and how it will be displayed by the web browser.
// <ul> stands for unordered list
// <li> stands for list

<ul>
  <li> list 1 </li>
  <li> list 2 </li>
</ul>
Definition list
Definition list tags are used when you have to explain a sub-heading before listing out its items. Below is the syntax of the definition list and how it will be displayed by the web browser.
// <dl> stands for definition list
// <dt> stands for definition term
// <dd> is where you put various data that relate with <dt>. Maybe you can call it definition data

<dl>
  <dt> Ingredient to cook beans </dt>
   <dd> Maggi </dd>
   <dd> Pepper </dd>
   <dd> Salt </dd>

  <dt> Ingredient to cook jollof rice </dt>
   <dd> Maggi </dd>
   <dd> Pepper </dd>
   <dd> Salt </dd>
   <dd> Seasoning </dd>
</dl>
Image tag
The image tag is used to add images to the web page. The image tag is also an example of an empty tag discussed previously. Image tag syntax comes with some other features which are referred to as attributes. Attributes have value and name. Image of attribute name and value.
Below is the syntax of adding an image to a web page.
// The image tag has some attribute that is used with it one of them is the alt and src attribute
// The alt attribute has an attribute value that provides a text description of the image if you can't see it.
// The src attribute provides the location of the image

<img src="google.com/image1" alt="This is a fake image URL" />
Link tag
Link tags are used to add URL to another location on the internet on a web page. Below is how it's been written. The attribute with the attribute name href and the attribute value are put in the double quote. The content of the double quote is the URL to the linked web page.
<a href="https://www.google.com/"> Google </a>
Form tag
Form tags are used to add input boxes to the web page. Input boxes are boxes you see on the web page that usually collects information from users to perform some actions.
The form tag usually has two attributes. The action attribute and the method attribute. The value of the action attribute in the double quote determines what will happen when the submit button is clicked.
The value of the method attribute in the double quote is usually one of the following values "POST" or "GET". The GET is used when data is to be retrieved from a database while a POST is used when data is been registered or updated to the database.
There are several Forms used on the web pages. Below I will discuss only the forms for adding text.
Forms for adding text
        <form action="submit.php" method="POST">

         <input type="text" name="username" /> <br > <br >

         <input type="password" name="password" /> <br > <br >

         <textarea name="comment" cols="30" rows="10"> Enter your comment here </textarea> <br > <br >

         <input type="submit" name="submit" />

        </form>
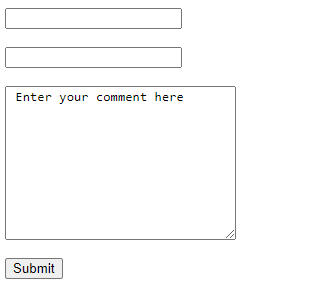
This is how the code above will display in a web browser
Explanation of Forms for adding text
The form tag above has three input tags and a textarea tag. Input tags are themselves empty tags as they do not have a closing tag.
The first input tag has a type attribute name with an attribute value text. This means that the box is used to collect short texts. Also the first input tag as a name attribute called name with the value username. This name attribute is used to differentiate each input from each other, it should be unique because the attribute name and value are been sent to the backend. When there is two input tag with the same name attribute value it causes clash.
The second input tag will provide the same outcome except that it has a type attribute with a value password. This means the field will accept password and as user input password the password is been shown as asterisks.
The third tag is a textarea tag which is mostly used to accept comments from users. It has cols and rows attributes which are used to determine the width and height of the box.
The fourth tag is a submit button. It will not be accepting any input rather be clicked on.
CONCLUSION
You have come to the end of part-1 basic frontend knowledge to getting you started in the backend web development. You have been introduced to frontend web development. You now have a basic understanding of how it works with the backend. You have minimum knowledge of frontend to complement testing your backend as you will later realize.


